# Lesson 23 Vue Router and Single Page Apps
Vue Router makes building Single Page Applications with Vue.js easy.
In previous lessons we have created websites with HTML, and added link elements like this <a href="https://mhintegrity.com/2019/03/22/Lesson-22.html">Lesson 22</a>. The <a> tag has an attribute href, which specifies for the browser the link's destination. The browser will call the web site using what is called an HTTP GET call to request the new page from the web site.
# Traditional calls to the Web Server
Each page of your website is a separate call to the web server.
# Sample Code
All Sample code can be found at https://github.com/mhintegrity/lesson23
The Traditional HTML pages can be found on the 01 sub directory here
# Single Page Application
A SPA (Single Page Application) is a web site where all of the pages are contained within one page, and none of the links send the browser back to the web server for a new page.
In our example diagram above you can see the URL localhost:8080/index.html#/about has a hashtag slash about #/about. Anything in a URL after a hashtag (# also called a pound sign) is a location inside the page. So we can break this URL into 3 parts.
localhost:8080is the authority (address of the site on the web, we call DNS to translate this to IPv4 address)/index.htmlis the path (tells the web server what page is requested)#fragmentis where in the page (secondary reference)
Note: you can find more details about URL's at https://developer.mozilla.org/en-US/docs/Learn/Common_questions/What_is_a_URL
- Video Link What is a Single Page Application
- Length: 4:35 minutes
- Size: 18 MB
# Vue Router Example Using the Vue Cli
Lets create our new project using the Vue CLI.
vue create spa
If you get text (like below) telling you there is a an update available.
Vue CLI v3.5.1
┌───────────────────────────┐
│  Update available: 3.5.5  │
└───────────────────────────┘
? Please pick a preset: (Use arrow keys)
> default (babel, eslint)
  Manually select features
- Type
<ctrl> cto cancel your current commandvue create, and return you to the command prompt. - Here is the command you use to update your global version of vue cli.
npm update -g @vue/cli
- Use Vue Cli to create our new project.
vue create spa
- Choose
Manually select features - In addition to
BabelandLinter / FormatterselectRouter
Vue CLI v3.5.5
? Please pick a preset: Manually select features
? Check the features needed for your project:
 (*) Babel
 ( ) TypeScript
 ( ) Progressive Web App (PWA) Support
>(*) Router
 ( ) Vuex
 ( ) CSS Pre-processors
 (*) Linter / Formatter
 ( ) Unit Testing
 ( ) E2E Testing
- Next you will be asked if you want to
use history mode for router?, for this first example choosen.
Vue CLI v3.5.5
? Please pick a preset: Manually select features
? Check the features needed for your project: Babel, Router, Linter
? Use history mode for router? (Requires proper server setup for index fallback in production) (Y/n) n
- Next pick a linter, choose
ESLint with error prevention only.
Vue CLI v3.5.5
? Please pick a preset: Manually select features
? Check the features needed for your project: Babel, Router, Linter
? Use history mode for router? (Requires proper server setup for index fallback in production) No
? Pick a linter / formatter config: (Use arrow keys)
> ESLint with error prevention only
  ESLint + Airbnb config
  ESLint + Standard config
  ESLint + Prettier
- Next pick
Lint on save.
Vue CLI v3.5.5
? Please pick a preset: Manually select features
? Check the features needed for your project: Babel, Router, Linter
? Use history mode for router? (Requires proper server setup for index fallback in production) No
? Pick a linter / formatter config: Basic
? Pick additional lint features: (Press <space> to select, <a> to toggle all, <i> to invert selection)
>(*) Lint on save
 ( ) Lint and fix on commit
- Next pick
In dedicated config files.
Vue CLI v3.5.5
? Please pick a preset: Manually select features
? Check the features needed for your project: Babel, Router, Linter
? Use history mode for router? (Requires proper server setup for index fallback in production) No
? Pick a linter / formatter config: Basic
? Pick additional lint features: (Press <space> to select, <a> to toggle all, <i> to invert selection)Lint on save
? Where do you prefer placing config for Babel, PostCSS, ESLint, etc.? (Use arrow keys)
> In dedicated config files
  In package.json
- Next pick
NforSave this as a preset for future projects?.
Vue CLI v3.5.5
? Please pick a preset: Manually select features
? Check the features needed for your project: Babel, Router, Linter
? Use history mode for router? (Requires proper server setup for index fallback in production) No
? Pick a linter / formatter config: Basic
? Pick additional lint features: (Press <space> to select, <a> to toggle all, <i> to invert selection)Lint on save
? Where do you prefer placing config for Babel, PostCSS, ESLint, etc.? In dedicated config files
? Save this as a preset for future projects? (y/N)
- The Cli tool will run and build you a basic SPA website including Vue Router.
Vue CLI v3.5.5
✨  Creating project in C:\src\lesson23\spa.
⚙  Installing CLI plugins. This might take a while...

[       ...........] - diffTrees: xxxxxxxxxxxxxxxxxxxxxxxx
- Now change the current directory to the new project
spa, then start the local server for the new project.
$ cd spa
$ npm run serve
 DONE  Compiled successfully in 4233ms                                                                                                 11:46:16 PM

  App running at:
  - Local:   http://localhost:8080/
  - Network: http://192.168.1.177:8080/

  Note that the development build is not optimized.
  To create a production build, run npm run build.
- Open up the web page by clicking on http://localhost:8080/
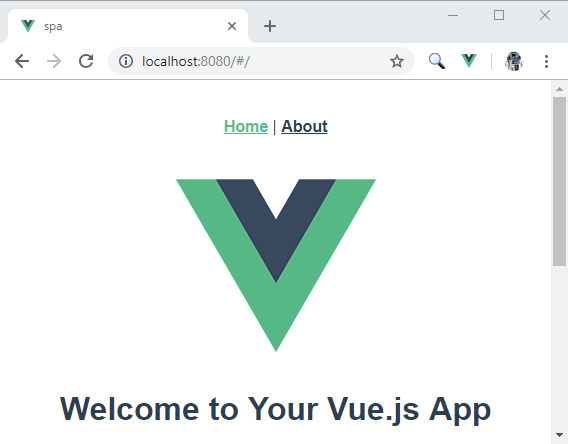
- Click on the
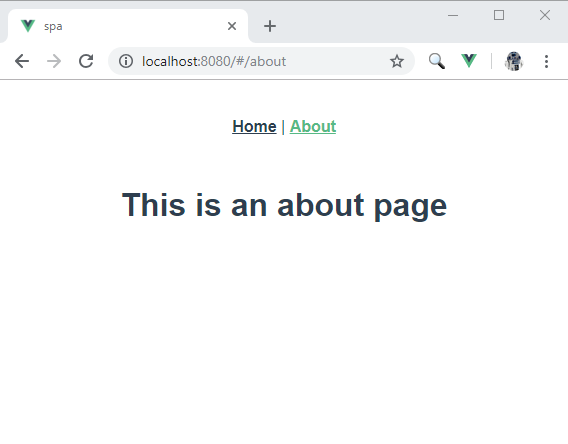
Aboutpage link, and you will see in the header that the about page URL ishttp://localhost:8080/#/about
# Vue Router, Single Page App
In our multi-page HTML web site we used the HTML element tag <a>, now with Vue Route we have a new custom element tag <router-link>. Here is an example of the same link in both tags.
<a href="./about.html">About</a>./about.htmlis a relative path at the same level for a file namedabout.html.
<router-link to="/about">About</router-link>- use router-link component for navigation.
- specify the link by passing the
toprop. <router-link>will be rendered as an<a>tag by default.- the path
/aboutis caught in thespa/src/router.jsfile line 15path: '/about',
# Vue Router, Matching Routes to View Components
Open the file /src/router.js, so we can analyse how Vue Route works.
import Vue from 'vue'
import Router from 'vue-router'
import Home from './views/Home.vue'
importandexportare commands used to share (export) and use (import) JavaScript libraries. Webpack is the build system we are using with Vue-Cli, and it uses these JavaScript (ES6) commands. You can find more details about import and export for webpack hereimport Home from './views/Home.vue'is used to import our custom componentAbout.vuewhich we are storing in the directory/src/views/
Vue.use(Router)
- Because we are using Vue-Cli, after importing
VueandVueRouterwe need to callVue.use(Router)to start the router.
export default new Router({
  routes: [
    {
      path: '/',
      name: 'home',
      component: Home
    },
    {
      path: '/about',
      name: 'about',
      // route level code-splitting
      // this generates a separate chunk (about.[hash].js) for this route
      // which is lazy-loaded when the route is visited.
      component: () => import(/* webpackChunkName: "about" */ './views/About.vue')
    }
  ]
})
- The
routesproperty is where we define our routes and map them to components. pathrefers to the path part of the URL. If you need more information about the parts of a URL please refer to the documentation here https://developer.mozilla.org/en-US/docs/Learn/Common_questions/What_is_a_URL.- We are mapping two paths to two components. This means that when we type in the browser title bar, either of these paths
http://localhost:8080/#/orhttp://localhost:8080/#/aboutwe will get our two pages. - Both of the components are imported:
homeandabout. We are storing both of these components/src/views/About.vueand/src/views/Home.vuein a folder namedviewsto make them easier to find. They are both still components, but we are calling them views because they are layout sections of our page. - Any components like a display card, we will store in the
componentsfolder, notviews. - for the
aboutview there is some advanced code that waits till the user goes to the about page before loading the about view.
# Vue Router, Page Layout in App.vue
Open the file /src/App.vue, and look at the template, so we can analyse how we are using view components to layout the page.
<template>
  <div id="app">
    <div id="nav">
      <router-link to="/">Home</router-link> |
      <router-link to="/about">About</router-link>
    </div>
    <router-view/>
  </div>
</template>
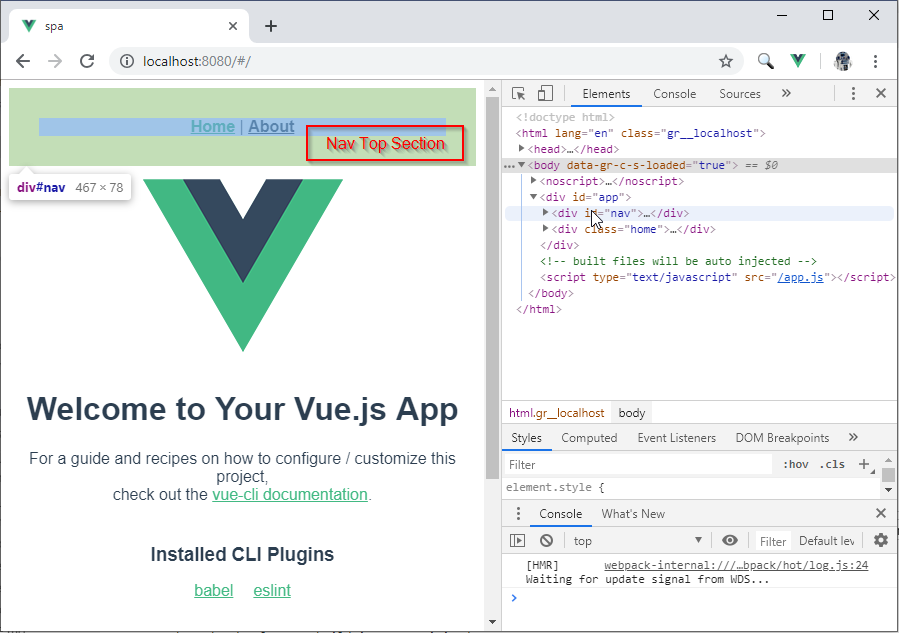
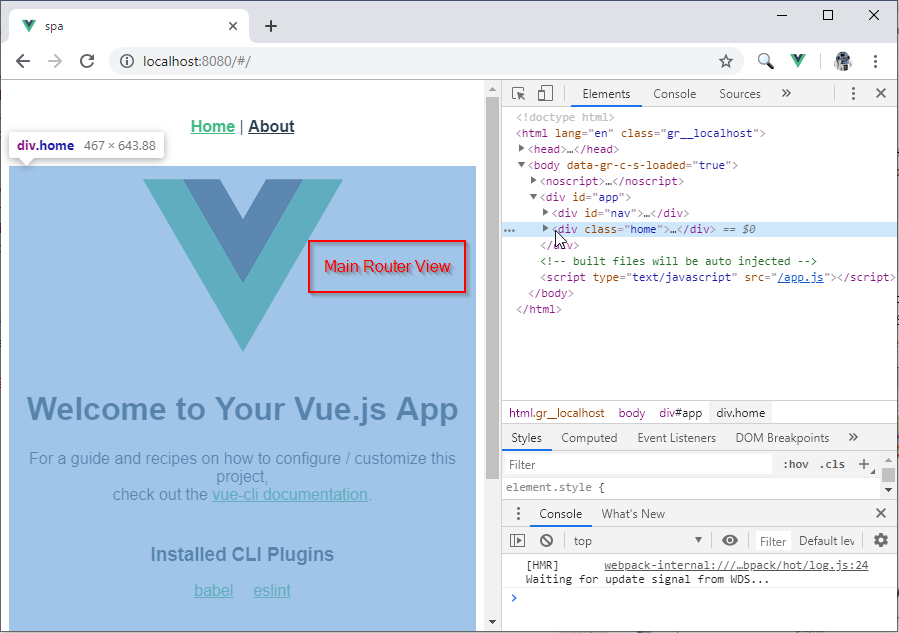
- Our page is broken down into two sections, the Nav Top Section and the Main Router View. The Nav Section is always at the top and our routes change out the
<router-view>with our two viewshomeandabout. - The
<div id="app">contains the entire Vue application. - The
<div id="nav">contains the Nav Top Section
- The
<router-view/>is a built in functional component that renders the matched component for the given path. Components rendered in<router-view>can also contain its own<router-view>, which will render components for nested paths. In our case one of our two views we saw in/src/router.jswill be displayed. - You can find more details about
<router-view/>in the documentation here https://router.vuejs.org/api/#router-view.
- The next image show the same page after clicking the
Aboutnavigation item.

- Video Link Vue Router
- Length: 7:44 minutes
- Size: 27.5 MB
# Router Navigation in JavaScript
The <router-link> built in component creates an <a> element to allow navigation on your pages. There are many times when you want do navigation in your JavaScript code, so there is a programmatic way to navigate. We do this using methods on the router's instance.
router.push(location);
You have access to the router instance using this.$router
We can make the app navigate to a new route using these methods.
  // named route using an object
  this.$router.push({ name: 'home' });

  // literal string path
  this.$router.push('/');

  // path using an object
  this.$router.push({ path: '/' });

  // go back by one in the navigation history
  this.$router.go(-1);
Lets try all of these programmatic methods out in our basic vue router app.
There is more details about programmatic navigation located at https://router.vuejs.org/guide/essentials/navigation.html#programmatic-navigation.
- Add a button in our About.vue view/component that sends us back to the home page.
- In the template section under
<h1>add a button that calls a method.<button v-on:click="goHome">Back Home</button> - In the
<script>section addmethodsand a function namedgoHome - Then try out each of the example calls above.
<template>
  <div class="about">
    <h1>This is an about page</h1>
    <button v-on:click="goHome">Back Home</button>
  </div>
</template>
<script>
export default {
  name: 'about',
  methods: {
    goHome: function() {
      // named route using an object
      this.$router.push({ name: 'home' });
    }
  }
}
</script>
- Video Link Router Navigation in JavaScript
- Length: 5:06 minutes
- Size: 15 MB
# Assignment due for discussion next class and checked into GitHub by the Monday after that
- Download the sample html website found in the 01 directory at https://github.com/mhintegrity/lesson23/tree/master/01
- Using vue-cli follow the steps in this lesson to create our own project with vue router in a git repository of your own, name it lesson23.
- Using the 01 html project and the template created by vue-cli reproduce the 01 web pages as a SPA single page vue app.
