# Lesson 25 Firebase User Login
# Firebase Authentication
Start with our lesson homework from lesson 23, a single page app made with the Vue Cli and Vue Route that has two pages, the user page, and the home page.
The final code for this lesson can be found at https://github.com/mhintegrity/active-awards
The running application can be found at https://active-awards.firebaseapp.com
# App Architecture
Our app will consist of three views: Home view, User view, and SignUp view.
The Home view can only be accessed with authentication, and the other two (User view and SignUp view) can be accessed at any time. This means that when a user comes to the site they will only see the User view where they can login.
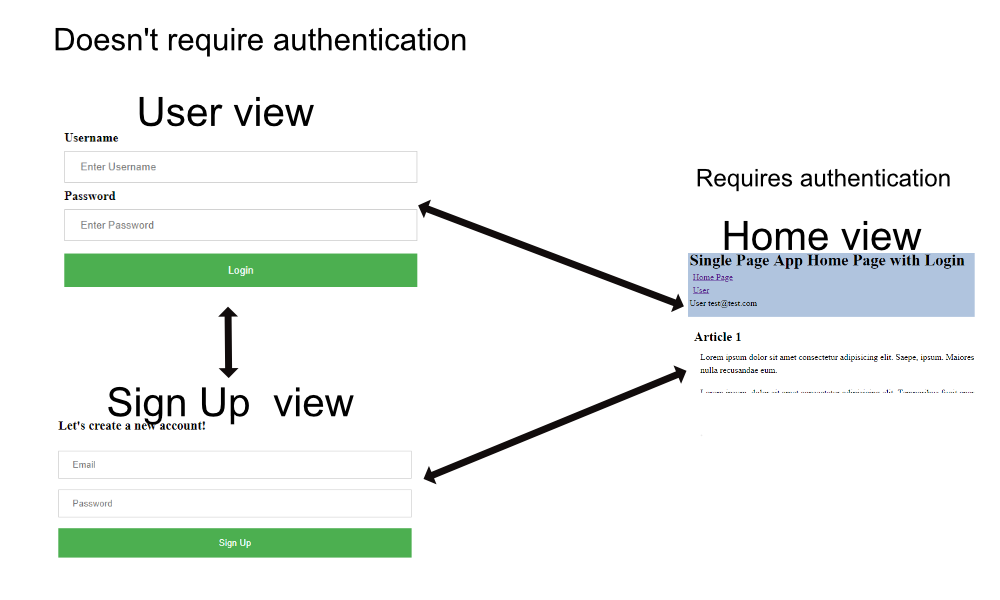
After a successful login, the user will be redirected to an authenticated part of the app, the Home view.
# User Login and SignUp views
In Lesson 23 homework we created a single page app with routing between two views, Home and User.
Notice that we are calling them views and not pages, plus we are storing them in a directory named views. These views are Vue components, but we are using them to change what we display when the user navigates using Vue routes.
Let us take a quick look at our User.vue view.
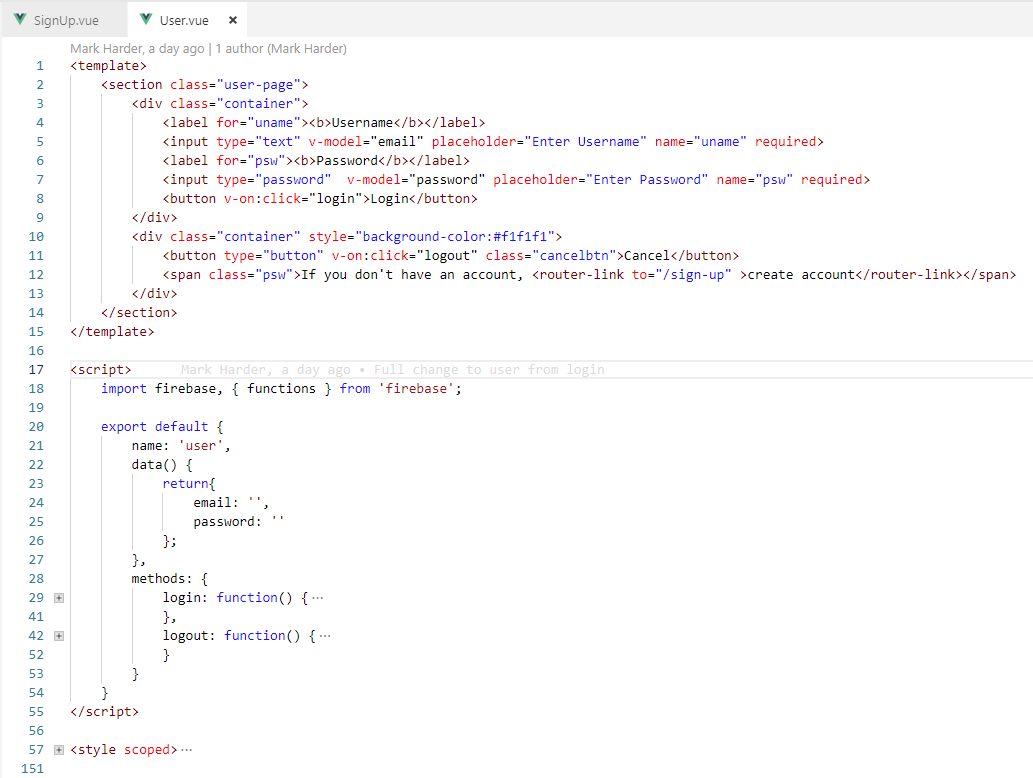
- Line 5 the Username text box is bound to the
datavariableemailon line 24 usingv-model="email" - Line 7 the password text box is bound to the
datavariablepasswordon line 25 usingv-model="password" - Line 8 the
Loginbutton will call the methodloginon line 29 usingv-on:click="login". We will look at the details of this functionloginin the future section Firebase Login - line 11 the
Cancelbutton will call the methodlogouton line 42 usingv-on:click="logout". We will look at the details of this functionlogoutin the future section Firebase Login - Line 12 provides a way for the web user to navigate to the Signup view. We learned about
<route-link to="/sign-up"in Lesson 23. The router/sign-upis covered in the section Vue Router and access only with authentication
Let us add another view to our app so that the first time user can get a login. SignUp.vue
Our SignUp page template is similar to the User view.
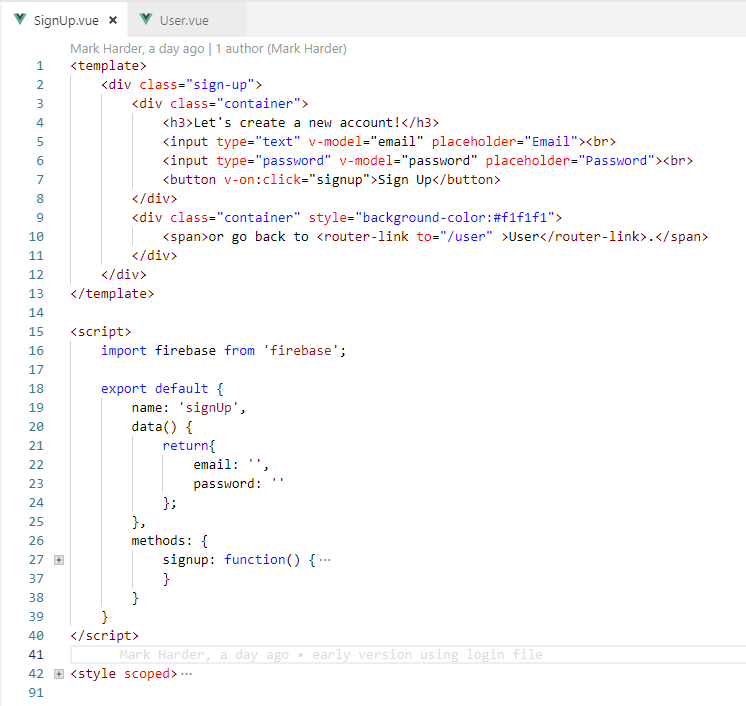
- Line 5, 6, 7 works similar to User.vue view above.
- Line 12 provides a way for the web user to navigate to the User view. We learned about
<route-link to="/user"in Lesson 23. The router/useris covered in the section Vue Router and access only with authentication
# Firebase Login
In Lesson 24 we learned how to add our project to firebase and deploy it. Now we are ready to implement firebase in our app so that we can use it's authentication system.
Goto your Firebase console https://console.firebase.google.com and either add your project or select it.
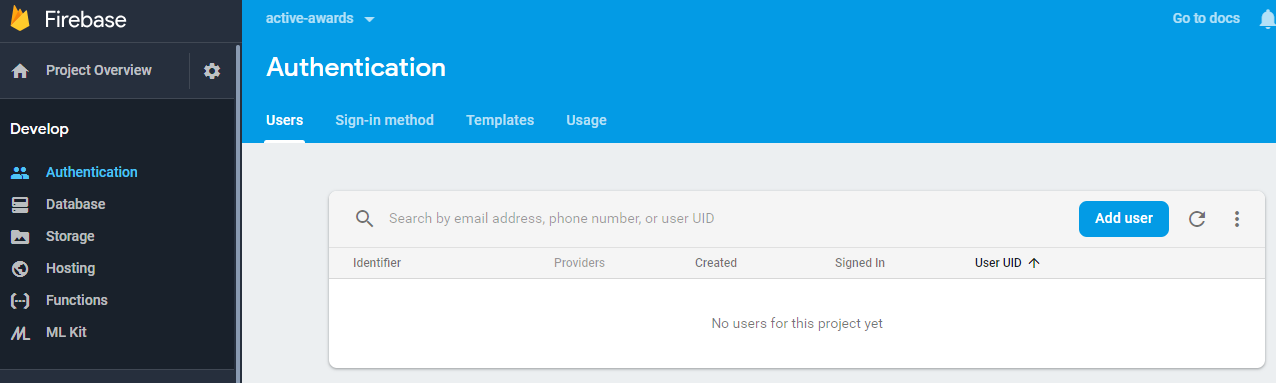
On the left menu item Develop select Authentication
The Users tab will have no users yet.
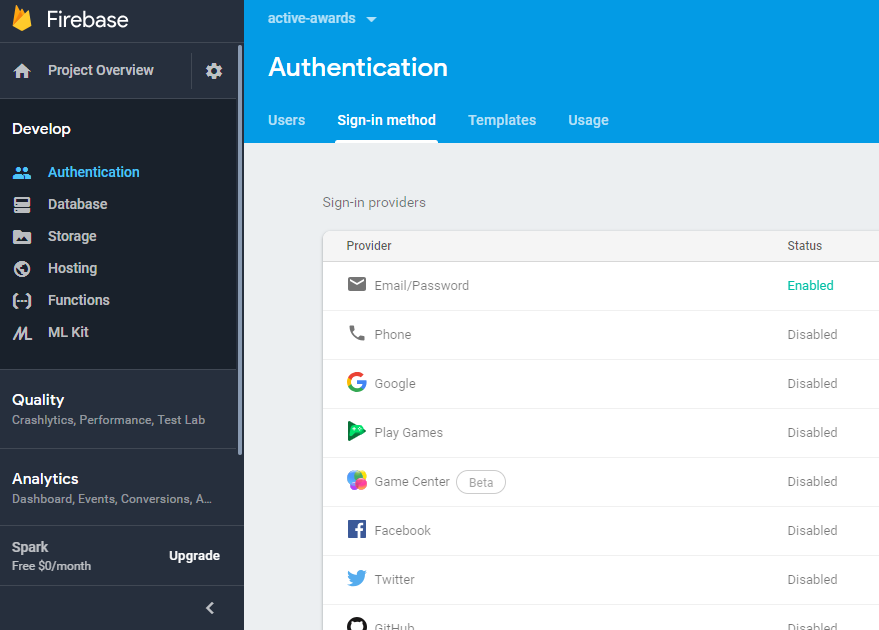
Select the Sign-in method tab and then Email/Password. Change the status to Enabled.
There are multiple provider methods to choose from, for our example we will be showing Email/Password.
Next we will need to integration Firebase into our application code.
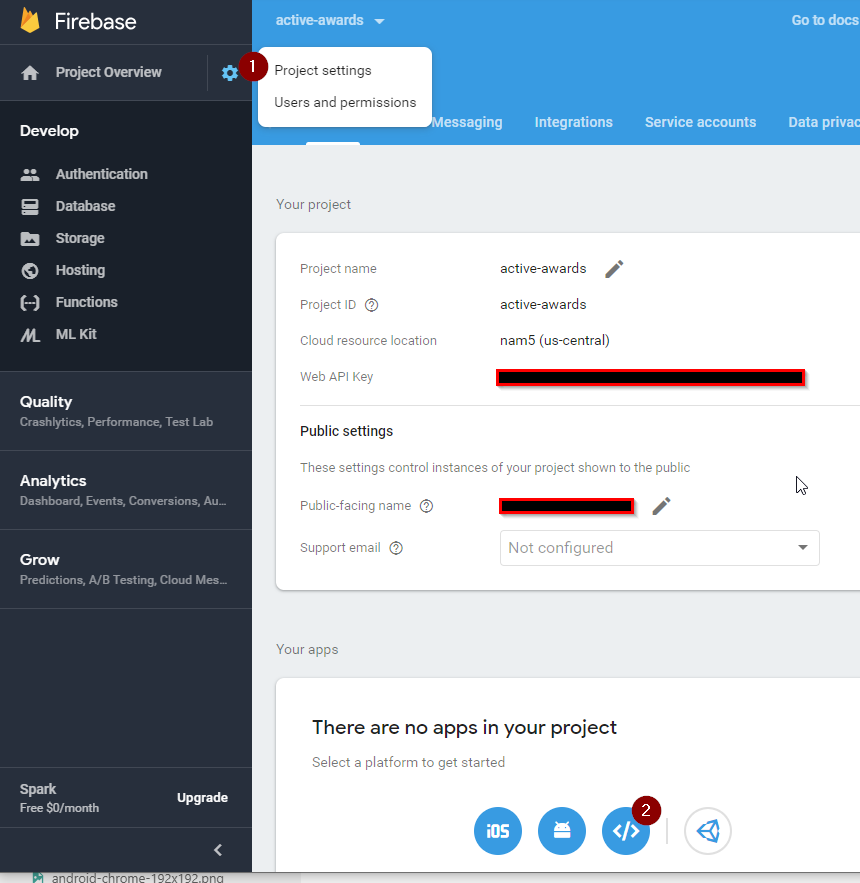
- Click in the Project Overview
Settingsgear, thenProject settingsto get to the Settings screen - Click on the web
<>icon to get the JavaScript code you need to initialize your code.
You will see code that you will need to copy in a format like this:
<script src="https://www.gstatic.com/firebasejs/5.11.1/firebase.js"></script>
<script>
  // Initialize Firebase
  var config = {
    apiKey: "XXXXXXXXXXXXXXXX",
    authDomain: "active-awards.firebaseapp.com",
    databaseURL: "https://active-awards.firebaseio.com",
    projectId: "active-awards",
    storageBucket: "active-awards.appspot.com",
    messagingSenderId: "#########"
  };
  firebase.initializeApp(config);
</script>
In your project code.
- Add a new
helpersfolder undersrc - Add a new JavaScript file named
firebaseConfig.js - Add Javascript based on what you copied above to look like this.
export const config = {
  // Initialize Firebase
    apiKey: "XXXXXXXXXXXXXXXX",
    authDomain: "active-awards.firebaseapp.com",
    databaseURL: "https://active-awards.firebaseio.com",
    projectId: "active-awards",
    storageBucket: "active-awards.appspot.com",
    messagingSenderId: "#########"
}
In the command line of our project we need to add firebase as a library, to do so:
$ npm install -- save firebase
Once the installation is done, let’s import Firebase module to our app. Open the main.js file, and initialize Firebase with the configuration code we copied earlier.
Next we update the main.js file to initialize our project based on our new firebaseConfig file.
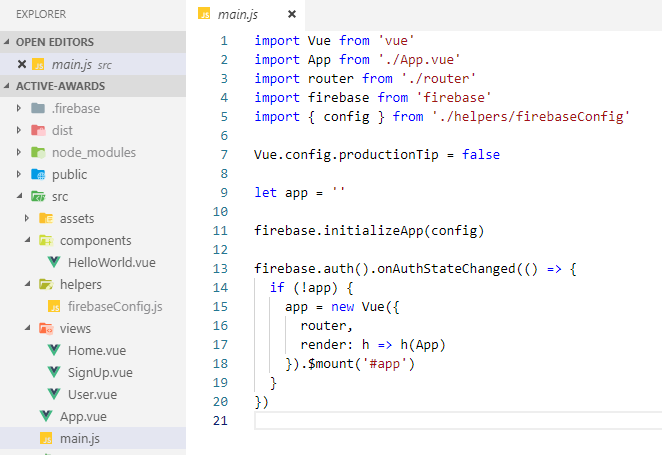
- Line 5 we import the new
firebaseConfig.jsfile into our code as an object variable named config. The{}around config makes the variable an object when imported. - Line 11 we use the new config object variable to initialize firebase.
- Line 13 we enable firebase authentication for our mounted vue app.
# Firebase SignUp with Email and Password
Lets return to the SignUp view and add JavaScript code to create a new user.
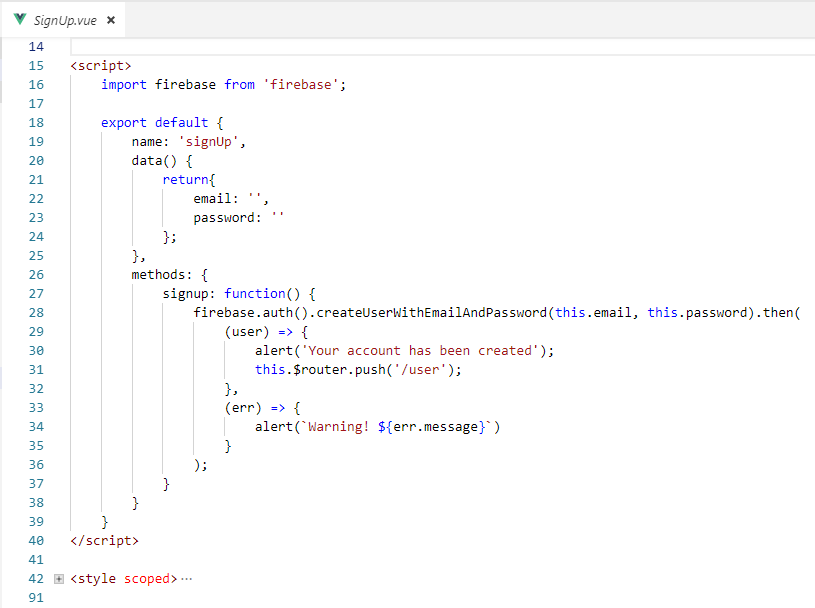
We said above that when the user clicks the Sign Up button on line 7 that method signup is called on line 27.
- Line 28 is a call to the firebase library to create a new user based on the
datavariableemailandpassword. This function call will go away and try to contact Firebase over the internet. After it returns the.then();part of the code will run. This is called an asynchronous call using a Promise. - Line 29 this arrow function with a variable named
useris the called when the asynchronous Promise is returned successfully from calling Firebase over the internet. - Line 31 call the $router.push to route the page back to the
/userview - Line 33 this second arrow function with a variable named
erris returned when the asynchronous Promise is returned with an error. Next we use the error on line 34 to alert the user what is wrong.
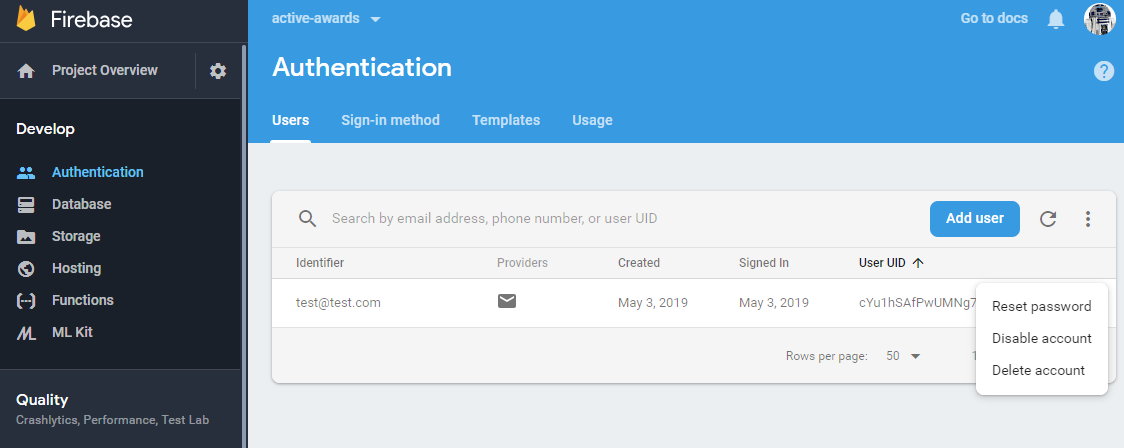
Now when we return to our Firebase console and look again at the Users under Develop | Authentication we can see our new user. I added a user with an Email of test@test.com.
# Firebase Login with Email and Password
Lets return to the User view and add JavaScript code to login a user.
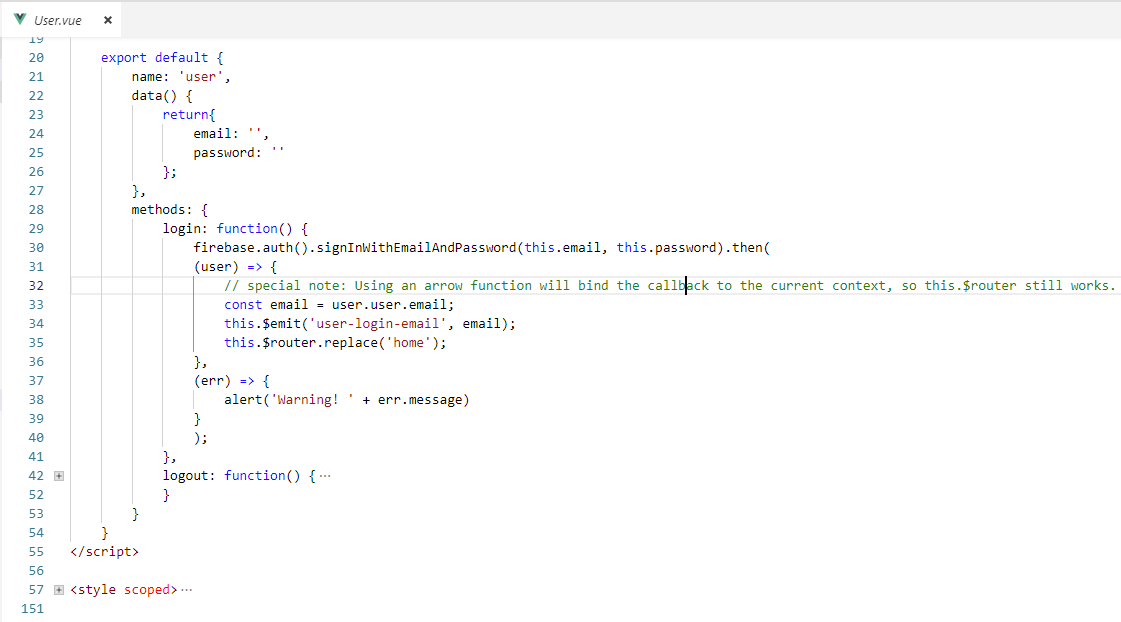
We said above that when the user clicks the Login button on line 8 that method login is called on line 29.
- Line 30 is a call to the firebase library to login based on the
datavariableemailandpassword. This function call will go away and try to contact Firebase over the internet. After it returns the.then();part of the code will run. This is called an asynchronous call using a Promise. - Line 34 In lesson 22 we learned about
Passing Data from Child Component to Parent, we are here emitting an event toApp.vueline 18 so that it updates adatavariableloginUserwhich is then used inApp.vueline 15. - Line 35 We are referencing the vue-route $router object so that we can redirect to the home screen.
# Vue Router and access only with authentication
We are now authenticated! But nothing happens, right? Well, we need to redirect the user to the part of the application that can be accessed only if the user is authenticated. We already defined in our app architecture that the authenticated view of our app will be the Home view.
To implement that in our Vue application, we can use the meta field of vue-router. A meta field is additional information you can set to your route.
To know more about meta, you can check the vue-router documentation here: https://router.vuejs.org/guide/advanced/meta.html
Let’s add a meta field to the Home view that we will use for this example. This meta will be called requiresAuth and will inform us that this view needs authentication. See Line 37
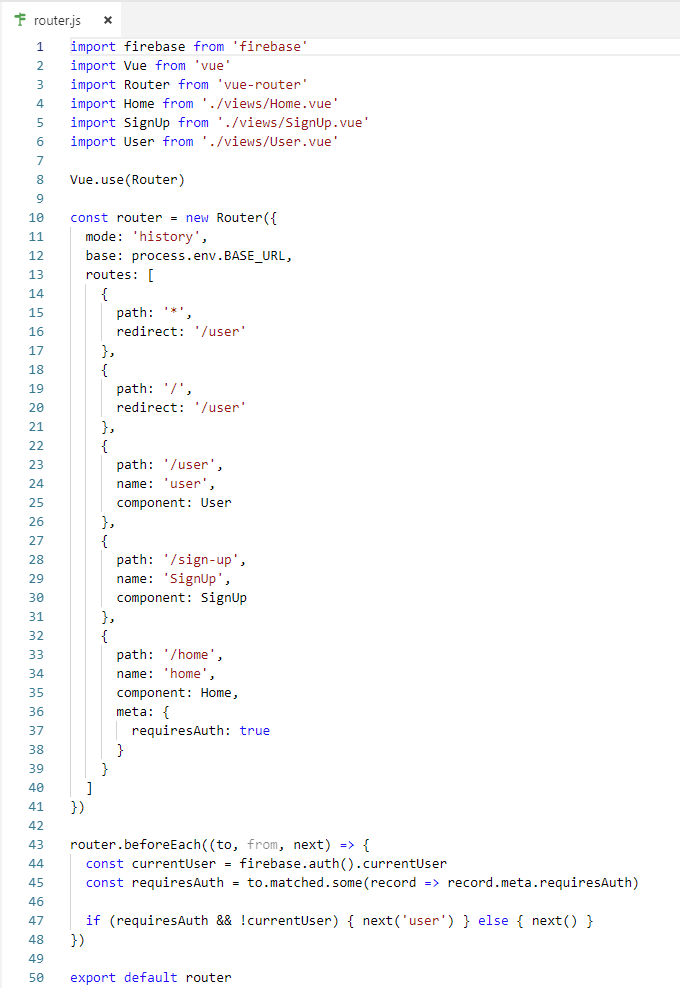
- Line 1 we import the firebase library, this is used on line 43 - 47 to check the current user to make sure they are authorized.
- Line 4, 5, 6 we import the components for our three views.
- Line 10 we are assigning the new Router to a local variable named
routerso that we can later on line 43 add a Life cycle method namedbeforeEach - Line 15 with
path: '*'we will redirect to the User view. You can now enter a bad url and you'll see that it redirects to the User view. - Line 37 The home path requires authentication, so it will not be available without the user being logged in.
- Line 43 See Vue Router guide about Navigation Guards, Global Before Guards. As the name suggests, the navigation guards provided by vue-router are used to guard navigations either by redirecting it or canceling it.
Let us look at the code for router.beforeEach, global navigation guard.
43 router.beforeEach((to, from, next) => {
44   const currentUser = firebase.auth().currentUser
45   const requiresAuth = to.matched.some(record => record.meta.requiresAuth)
46
47   if (requiresAuth && !currentUser) { next('user') } else { next() }
48 })
Every guard function receives three arguments:
to: Route: the target Route Object being navigated to.from: Route: the current route being navigated away from.next: Function: this function must be called to resolve the hook. The action depends on the arguments providednext(): move on to the next hook in the pipeline. If no hooks are left, the navigation is confirmed.next('path'): redirect to a different location. The current navigation will be aborted and a new one will be started.
Line 43 call the firebase library and get the currently login user. You can read more details about this in the firebase documentation found here: https://firebase.google.com/docs/reference/js/firebase.auth.Auth.html#currentuser
Line 44
towas passed in on line 43, we are now calling a functionmatched.some()in which we will check if it matches the requiredAuth. If the current user does match authentication from firebase the variablerequiresAuthwill be true, otherwise it will be false.Line 47
if (requiresAuth && !currentUser)checks to make sure that requiresAuth is true and that currentUser exists.!before currentUser flips the value of a boolean, so if currentUser doesn't exist it, we have a true statement.- So if requiresAuth is false or no current user then
{ next('user') }which will send the router to the User page.
If the route we navigate to does not require authentication and there is a user logged in, we redirect to the Home view.
# How to use this lesson in your project
- This pattern is a good place to start when adding authentication to your web applications.
- Use the meta field
meta: { requiresAuth: true }on all of the routes you want to block from users that are not logged in. https://router.vuejs.org/guide/advanced/meta.html - More details about the Firebase authentication can be found in the Firebase reference docs found here: https://firebase.google.com/docs/reference/js/firebase.auth
# No More Assignments
Work on your Project.
- Make sure to check-in your code to Github for your project every time you complete some work.
- After testing your code locally, deploy to Firebase.
- Ask other student in the class, and over Slack to try out what you have deployed to Firebase.