# Lesson 20 Vue.js Components
# Template Syntax
Vue.js uses an HTML-based template syntax that allows you to declaratively bind the rendered DOM to the underlying Vue instance’s data. All Vue.js templates are valid HTML that can be parsed by spec-compliant browsers and HTML parsers.
Under the hood, Vue compiles your templates into Virtual DOM functions that render. Combined with the reactive system, Vue is able to re-render and apply DOM manipulations when your app state changes.
Remember in lesson 10 we talked about the DOM and how you could use JavaScript to create, destroy and modify html elements live as they display on the screen. In this same way Vue is controlling what is rendered on the display. We can feed html elements to our Vue app using either a template, or html in our html page encapsulated in our Vue instance div.
Lets start with a simple Vue code example. In this example we will define a body element with two Vue instances: app1, app2.
- Body section of example1.html
<body>
    <div id="app1"><h1>{{ msg }}</h1></div>
    <div id="app2"></div>
</body>
- example1.js
var app1 = new Vue({
  el: '#app1',
  data: {
    msg: 'App 1 using html file'
  }
})
var app2 = new Vue({
  el: '#app2',
  template: `
  <div>
    <h1>{{ msg }}</h1>
    <h2>{{ msg2 }}</h2>
  </div>
  `,
  data: {
    msg: 'App 2 using Template string',
    msg2: 'second line of text'
  }
})
- You can see that in our first Vue instance, #app1, our html is in our HTML page.
- In our second Vue instance, #app2, our html is stored as a
templatedirective string. - Of course this won’t look pretty with big templates, so you should keep your templates short. In fact, if you are using single or double quotes, the string can only contain one line. However, if you use the ES6 syntax – which uses backtick – your string can span multiple lines, so let’s modify our template property to use this syntax, see app2.
var app2 = new Vue({
  el: '#app2',
  template: `
  <div>
    <h1>{{ msg }}</h1>
    <h2>{{ msg2 }}</h2>
  </div>
  `,
  data: {
    msg: 'App 2 using Template string',
    msg2: 'second line of text'
  }
})
- Note: Template should contain exactly one root element. This is why we are wrapping our second template in a div.
- Using template in this way will make more sense in the section on components below.
- Video Link Template
- Length: 5:21 minutes
- Size: 19 MB
# Computed Properties
Computed properties give us a way to take our data, do something with it, and return the result. We want to take our data and without changing it we want to control how we output it. In the previous section on template expressions we see that
- Lets change our code in the previous section to reverse the words msg2. we could replace our template string with the following code. It uses inline JavaScript to breakup the words in our sting, reverse them, then join them back together.
- example2.js
<h2>{{ msg2.split(' ').reverse().join(' ') }}</h2>
- Lets simplify our code and move the transforming logic in the template to a computed property. This will help maintain our code and prevent our template from getting bloated.
- example2.js
  var app2 = new Vue({
    el: '#app2',
    template: `
    <div>
      <h1>{{ msg }}</h1>
      <h2>{{ reverseMsg2 }}</h2>
    </div>
    `,
    data: {
      msg: 'App 2 using Template string',
      msg2: 'second line of text'
    },
    computed: {
        reverseMsg2: function() {
            return this.msg2.split(' ').reverse().join(' ');
        }
    }
- We see the new computed directive section with a new function names reverseMsg2, which performs the code we embeded in our template in the example above. This simplifies and allows us to just reference the computed function instead of our variable msg2.
- A computed method is different then a regular method in one way, it values are cached. This means that if msg2, the dependency data, doesn't change, then using reverseMsg2 will only run the first time, and the cached values will be used instead. If your data rarely changes, and is called often, then a computed property will run faster then a method.
- It is important to realize that any data used in a computed property that is not a reactive dependency will not re-calculate.
- In comparison, a method invocation will always run the function whenever a re-render happens.
- Video Link Computed
- Length: 6:30 minutes
- Size: 22 MB
# Watchers
A watcher is a special Vue.js feature that allows you to spy on one data property, and run a function when that property value changes. This is a generic way to observe and react to data changes.
- It is important to note that if you can used a computed property instead of a watch property, the computed property will be faster.
- index3.html
    <div id="app1">
        <h1>Full Name: {{ fullName }}</h1>
        <input type="text" v-model="firstName" placeholder="First Name">
        <input type="text" v-model="middleName" placeholder="Middle">
        <input type="text" v-model="lastName" placeholder="Last Name">
    </div>
- app3.js
new Vue({
    el: '#app1',
    data: {
        firstName: '',
        middleName: '',
        lastName: '',
        fullName: 'first middle last'
    },
    watch: {
        firstName: function(){
            this.fullName = `${this.firstName} ${this.middleName} ${this.lastName}`;
        },
        middleName: function(){
            this.fullName = `${this.firstName} ${this.middleName} ${this.lastName}`;
        },
        lastName: function(){
            this.fullName = `${this.firstName} ${this.middleName} ${this.lastName}`;
        }
    }
})
- Video Link Watchers
- Length: 3:31 minutes
- Size: 14 MB
# Vue.js Components
In earlier examples in this lesson, we used two instances of Vue. When building more complex pages, we want to apply the engineering principle DRY, by creating reusable code components. This can be done with reusable Vue instances called a Vue component.
# Lets start with a simple component example.
Components are reusable Vue instances with a name
- example4.html
<body>
    <div id="components-demo">
        <label>1st
            <input-contact></input-contact>
        </label>
        <p></p>
        <label>2nd
            <input-contact></input-contact>
        </label>
    </div>
</body>
- example4.js
Vue.component('input-contact', {
  data: function () {
    return {
      contactName: ''
    }
  },
  template: '<label><input type="text" v-model="contactName" placeholder="Contact Name">{{ contactName }}</label>'
})

new Vue({
  el: '#components-demo'
})

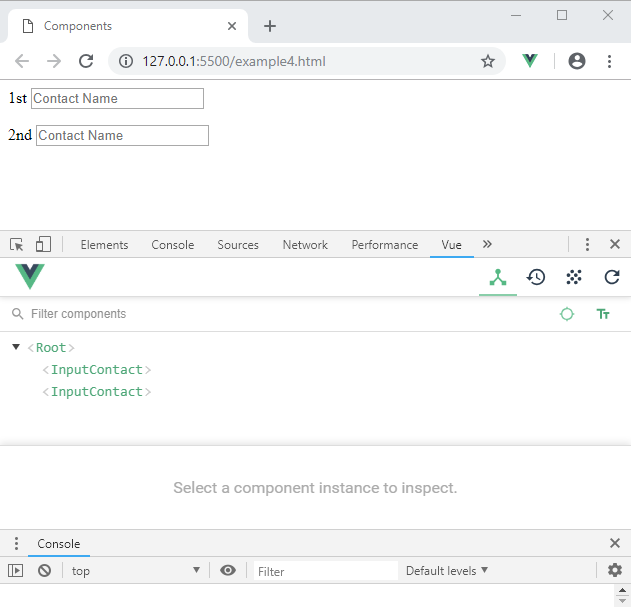
- We created a new component named
input-contact - We used template to define our html
- We then created our data item, which are only visible to our component. This data item is a little different then our Vue instance because our data needs to be contained in a function.
- Components can use many of the directives that a regular Vue instance can use, such as data, computed, watch, methods, and lifecycle hooks. The only exceptions are a few root-specific options like el.
- Components can be as many times as you like, our
was used 2 times in our example. - In our example we registered 'input-contact' in Vue.component(, this is globally registration.
- Globally registered components can be used in the template of any root Vue instance (new Vue) created afterwards – and even inside all subcomponents of that Vue instance’s component tree.
# Links
- Video Link Components
- Length: 4:59 minutes
- Size: 17 MB
# Assignment due for discussion next class and checked into GitHub by the Monday after that.
- Create a new repro called lesson20
- Copy the project you started in Lesson 19, or create a new project.
- Your project needs to create and use at least one component.
